Not too long ago I wrote about using Packer to build VM templates for Proxmox and created a Github project with the files. In the end I provided basic information on how to setup cloud-init within the Proxmox GUI. This time we’re going to dive a bit deeper into using cloud-init within Proxmox and customize it as needed.
First, lets quickly cover what cloud-init is. Cloud-init is a system for configuring an operating system on first boot. It is always used on cloud based systems like AWS, Azure, OpenStack and can be used on non-cloud based systems like Proxmox, VirtualBox or any system where you can present the info as a CD-ROM. Using cloud-init you can pass in instance meta-data information, network configuration and user information. As part of the user information you can also provide commands to be run. It is the ability to run commands on initial boot that we’re going to tap into.
Out of the box, Proxmox provides a basic cloud-init system that you can enable through the web interface that works well if all you need is to create a user with an SSH key and configure the network. But if you want to customize it you will need to ensure you have snippets enabled and visit the cli of your Proxmox system.
To start, I am using a VM template created from the tools uploaded to Github. No matter what you do, you must start with a base OS or image that has cloud-init installed into it and has not been initialized previously. If you are manually creating your OS images and are not sure if cloud-init has run you can reset it by issuing cloud-init clean -l. This will reset the cloud-init system and remove all of the logs. The next time the system boots it will run again.
Next, ensure you are running the latest version of Proxmox and have enabled the “snippets” option on the storage pool you use for container templates and ISO images in Proxmox. If you have been running Proxmox for awhile you may not have it enabled. You will find the option under the datacenter view and then by clicking on storage. Double click the storage pool you normally use for image storage and select Snippets from the drop down.
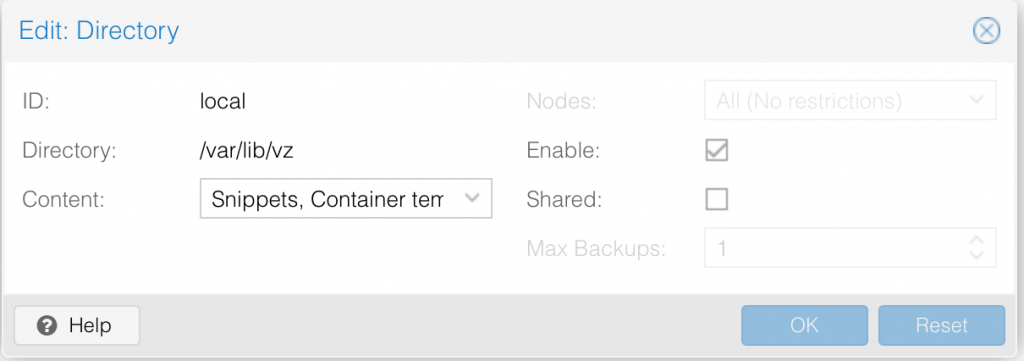
Once enabled you’ll have a new directory at the path shown called snippets. On my system that is at /var/lib/vz/snippets. With this in place you can create a new user data file and specify addition options. Here is an example user-data.yml file that contains all of the normal settings that Proxmox will, by default, set:
#cloud-config
hostname: CentOS7-Template
manage_etc_hosts: true
user: centos
ssh_authorized_keys:
  - <your public ssh key>
chpasswd:
  expire: False
users:
  - default
package_upgrade: true
Everything shown above is the default that Proxmox provides with the exception that I have set the user to be created to centos. To run custom commands as part of the boot process add a runcmd section to the file with a list of commands to be run. Something like this:
#cloud-config
hostname: CentOS7-Template
manage_etc_hosts: true
user: centos
ssh_authorized_keys:
  - <your public ssh key>
chpasswd:
  expire: False
users:
  - default
package_upgrade: true
rundcmd:
  - echo "Hello World!" > /run/output
This example will write out a file at /run/output which contains “Hello World!” in it. To use this custom cloud-init information create a clone of a VM template, ensure you have enabled a cloud-init drive on the new VM and then visit the cli of your Proxmox system. Enter the following information adjusting values in case you use a different storage pool or have named your user data file differently:
qm set <vmid> --cicustom "user=local:snippets/user-data.yml"This will tell Proxmox to change the user-data portion of the cloud-init data to use your customized user-data instead of the default. Now, when you boot the system and ssh into it you will find a file at /run/output with “Hello World!” in it. This isn’t the most useful thing so here is an example of a user-data file that will join to a freshly booted CentOS 7 system to a Rancher based Kubernetes cluster:
#cloud-config
hostname: rancher-worker.lan
manage_etc_hosts: true
user: centos
ssh_authorized_keys:
  - <public ssh key>
chpasswd:
  expire: False
users:
  - default
package_upgrade: false
runcmd:
  - yum install -y docker
  - systemctl enable docker
  - systemctl start docker
  - sleep 10
  - docker run -d --privileged --restart=unless-stopped --net=host -v /etc/kubernetes:/etc/kubernetes -v /var/run:/var/run rancher/rancher-agent:v2.3.5 --server https://<rancher-server> --token <token> --worker
This cloud-init file will result in the system automatically joining the Kubernetes cluster as a worker node.
Cloud-init is a powerful system that lets you customize a fresh VM (or even bare metal node) to your liking at first boot up. I hope this post has helped reveal how you can use cloud-init on a Proxmox system. For more information about using cloud-init in Proxmox visit the Proxmox wiki. For more detailed information about cloud-init itself visit the official cloud-init docs at https://cloudinit.readthedocs.io/en/latest/#. Remember to change the docs version to the version your OS ships with to ensure you are getting the right information. In future posts I’ll explore how to use cloud-init with other non-cloud based systems like VirtualBox.