Yesterday I was reminded that when a URL is shared on Mastodon, every instance that has a user following you, that server will make a request to your site at least once in an effort to get some additional embed information. If your site is WordPress based, like this one, then you will likely see two requests. The first request to your site will request the URL that was added to the post while the second one follows any embed information WordPress is exposing in order to get some additional meta data. Since Mastodon is a federated system, every Mastodon server or instance will need to gather this data in order for it to be displayed to its users.

If you are a user that has a lot of followers then posting a link to your blog or site will likely result in a mini DDoS has hundreds of Mastodon instances request this information from your server. If you have not taken precautions this can potentially take down your site as it is overloaded with requests! Years ago this would have been referred to as being “slash dotted” (links on https://slashdot.org) or “fireballed” (links on https://daringfireball.net).

Fortunately you can very effectively deal with this situation on your own or by working with your hosting provider. In this post, I am going to describe how I handle the situation using Cloudflare, which is the CDN provider I have chosen to put my site behind. I am not going into full detail on how to implement all options and I am not selling Cloudflare or associated with them beyond being a customer. What I share here will be applicable to any CDN or will at least serve as inspiration for how to handle it in your configuration.

As I said previously, this site is using WordPress and is behind Cloudflare. To make it easy on myself I have also purchased their Automatic Platform Optimization for WordPress feature. I got into this option initially because I wanted to understand it better but have since kept it because it works well. The biggest feature of APO for WordPress is that it enables full page caching for your site. This is a must if you want to get the best possible experience for users globally. Using APO is absolutely not necessary, you can simply use Nginx micro caching instead or any other caching solution, but the key here is to have full page caching so that repeated requests to your site do not incur actual processing time by WordPress.

APO will, out of the box, cache full pages of your site but what it will not protect is the meta data URL used to provide additional information for embeds. To prevent Mastodon servers from crushing your site with embed meta data requests, there is one additional endpoint you need to force to be cached. Here is how I forced Cloudflare to cache the correct URL for me.

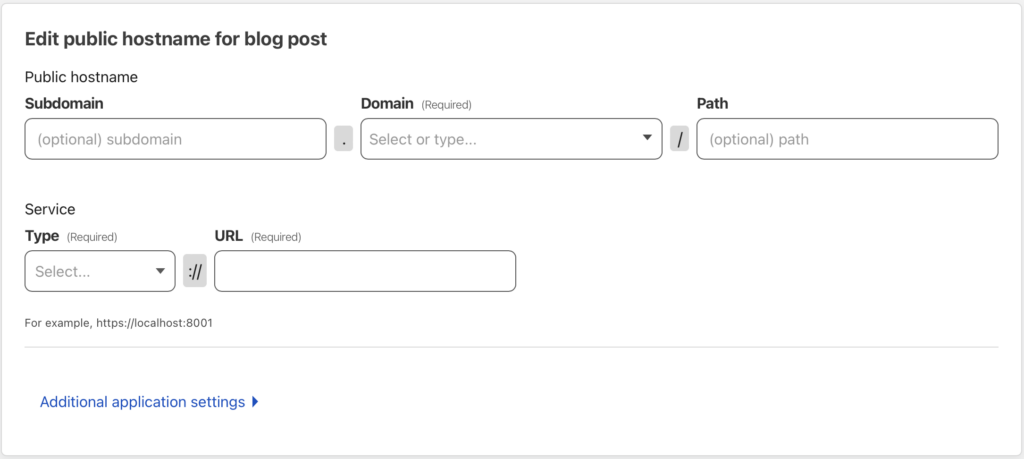
Login into Cloudflare and click on the domain for your site. Find the caching section of the menu and click on Cache Rules. Add a new rule and define what is shown in the screenshot

Screenshot showing a cloudflare configuration screen for caching an oembed request from Mastodon, or any system that would do this. Add a name for your rule, set the Field to URI Path contains the path /wp-json/oembed

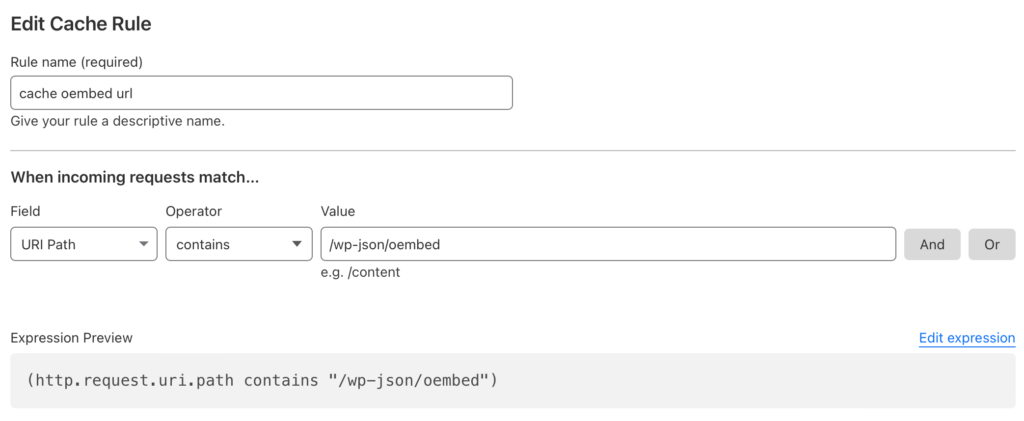
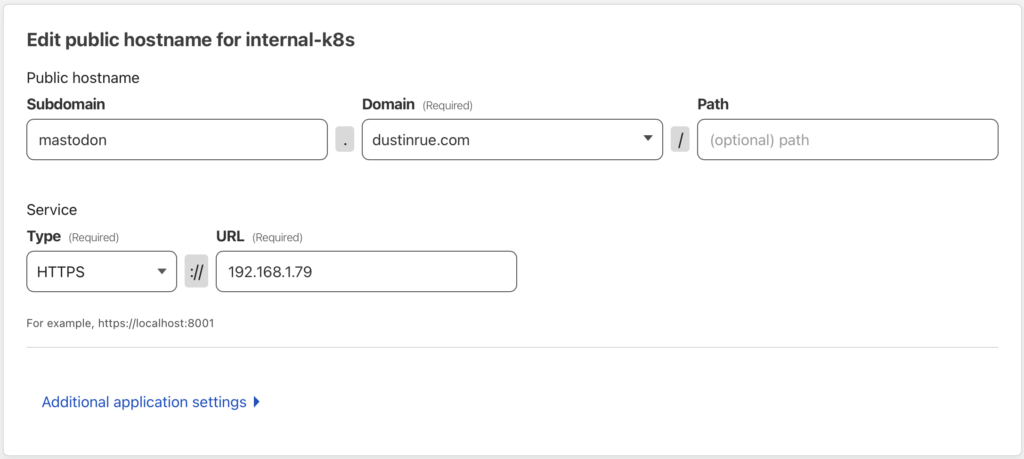
From here, tell Cloudflare what to do with this match

Screenshot showing another Cloudflare configuration screen. Here you should set the Cache status to "Eligible for cache" and "Override origin" set to 2 hours. 2 hours is the minimum option on a free plan

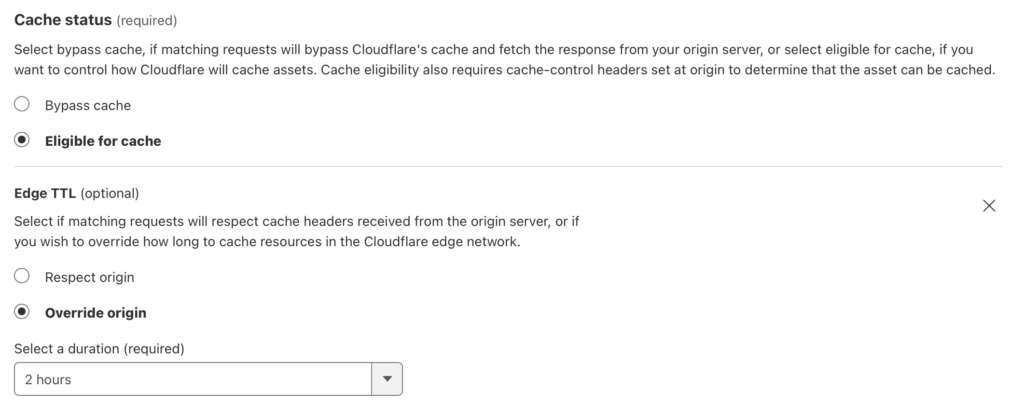
Note that 2 hours is the lowest cache time I can specify on an otherwise free Cloudflare plan so that is what I set it to. With these options filled out you can click save and you are done. Anything looking for this URL will now either get a cached copy of the response or will cause the content to be cached for future requests.

Of course, you don’t need to use Cloudflare to make this work. Savvy users can also translate these URLs to Nginx or Apache configuration to perform the trick. The goal is to ensure your WordPress site is better able to handle when you have shared a link to Mastodon and there are many options. Using Cloudflare is one option that has worked well for me. I encourage everyone that hosts a blog, either self-hosted or through some managed provider, to ensure that page caching and the oembed URL for WordPress is cached.

If you run a private instance of Mastodon it can feel mighty lonely sometimes. This is due to an inherent design characteristic of Mastodon and federated services in general…how does one instance get information from another instance? Typically, if you have a user on your instance that follows someone else then that information will be added to your instance, along with any hashtags they use and so on. If you run a small server, then obvious there are far fewer ways for information to flow to your instance.

Solving this problem is a matter of ensuring more data is flowing into your instance so that it can then see more content, and most importantly as of version 4.0 of Mastodon, additional hashtags. The easiest way of doing this (aside from running a large instance) is to use relays.

Relays, in essence, take in feeds from a number of instances and passes them to other instances attached to the relay. Finding a relay to add to your instance is as easy as going to https://relaylist.com and picking one or more to add to your instance. Relay servers usually support both Pleroma as well as Mastodon but remember the information you add to each is different. Be sure to add the right URL.

Screenshot showing relay URLs

You can subscribe to a relay by visiting /admin/relays in the admin dashboard of your instance and clicking the “Add New Relay” button. Simply pick a relay server from the list and add it using the correct URL. For Mastodon, the URL will end with /inbox in almost every case. After a short while you will begin to see your Federated timeline be populated with posts from other instances. Your instance will now see a lot of new content including hashtags that you can follow.

Keep in mind that bringing in this cost does have a cost associated with it. All instances of Mastodon will store everything it sees locally, including post content and media like images and video. It is a good idea to set retention limits on your system so that you are not storing everything ever seen forever. On my system I set my retention limits to 14 days for media and content cache and 7 days for user archives. You will find your instance’s content retention policy at /admin/settings/content_retention.

In addition to using more disk space (and bandwidth transferring all that media) you will also incur more processing time on your instance. The amount of space and processing you need depends heavily on which or how many relay services you add to your instance. For my instance I struck a balance between getting enough data flowing so that hashtags were interesting but not so much that I increased my costs unnecessarily. You can track this information in both your admin dashboard at /admin/dashboard (scroll to the bottom) as well as your chosen object storage provider (you did set one up right?).

If you are running a private instance and feel a bit left out I hope this helps you get the activity you are looking for. Also remember to follow a lot of people and boost content you like instead of just liking it. This will lead to more followers for yourself, more interactions and a more interesting timeline!

Since about mid December 2022 I have been running my own private instance of Mastodon. I thought I would detail how I did it and what it has cost me so far.

When I first learned about Mastodon I was excited to get to understand it better, particularly how it is hosted and scaled. For Mastodon, I decided right away that the best way to better my understanding was to host it myself and to do so on my favorite platform, Kubernetes. I started by creating my helm chart (https://github.com/dustinrue/mastodon-helm-chart) and installed the core software in my home lab which consists of k3s. The chart I created is based on the official helm chart (https://github.com/mastodon/chart). I created my own because I, again, wanted to learn about the moving pieces of a Mastodon installation but also because I was unhappy with the official chart integrating Redis and PostgreSQL as dependencies. In addition, it doesn’t break out the Sidekiq processes in a way that makes sense…but more on that later.

Before we can get to deep into what I did, we should probably first discuss some of the major components of a Mastodon instance or server. Mastodon is a collection of services working together to form a full solution which includes:

  • A web service which provides the user interface but is also the sort of API server for all things Mastodon. In a full production setup it is important that this be highly available.
  • A streaming service which feeds data to the web frontend as it arrives and is processed. This is almost important but doesn’t seem to be critical. In other words, you can survive a bit of downtime here, you’ll just have a less than great experience.
  • A number of Sidekiq queues. There are numerous Sidekiq queues which are the heart of how data moves in a Mastodon instance. These queues, as of this writing, include a scheduler, ingress, mailer, push, pull and default. Each queue has a specific purpose and each queue is again not absolutely critical to the availability of your Mastodon instance. This means that you can easily take down each queue temporarily to deal with some issue. While a queue is down know that nothing that queue is responsible for will be processed. The special scheduler queue, if not running, will likely prevent most other queues from doing anything at all.
  • Redis is a glue that keeps data flowing between processes. It is also a critical piece to keep running though losing data within it, while not ideal, is ok. Keeping it running is critical because all of the other Mastodon processes expect it to be available and will fail to start without it. In a full production setup I recommend ensuring it is running in a highly available fashion.
  • PostgreSQL is the last required piece of software when running Mastodon. Like Redis, it is what I could consider to be critical to your setup. If running a full production setup you will want to cluster it to maintain availability first with performance a secondary consideration.
  • You need some system for dealing with email. Mastodon needs to send email for account confirmation and some administrative or moderation work. For my system I am using Send In Blue (https://www.sendinblue.com) which has a free tier.

Mastodon also supports other, optional services which you can read about at https://docs.joinmastodon.org/admin/optional/.

As you can likely see, running Mastodon is not simple yet it isn’t overwhelming either. I believe running Mastodon can be done inexpensively, especially a private instance, but to run it in production correctly, there is definitely a base cost you need to consider so that you can remove as much failure points as possible. In addition, there are many other pieces you will likely want if running a large installation like how to monitor metrics, keeping track of Sidekiq queue depth and processing times and more.

Having spent some time on Mastodon during the great Twitter migration I witnessed some of the struggles of a number of instance admins as a their instances struggled to meet the demands of new users and users who had created accounts before but were suddenly active. I saw a few notable patterns emerge that contributed to their scaling woes including:

  • Not using a CDN or object storage system initially
  • Not installing pgbouncer in front of PostgreSQL
  • Not installing Sidekiq into separate processes running each queue

There are some really excellent guides and references on how to scale Mastodon (https://hazelweakly.me/blog/scaling-mastodon/ to name but one) but many of the recommendations will require you to do or have done one, if not all, of the above mentioned steps. Each of these items are disruptive in a way that you probably do not want to be trying to handle them while in a panic of trying to get your instance running again. If you are running or plan to run a public instance where you allow anyone to sign up then I highly recommend getting at least those three items out of the way from day one. Doing so will help ensure that scaling up from there is much, much easier as most items will then become adding additional servers to run more Sidekiq processes or tuning parameters.

When I created my helm chart, I took these lessons and applied them as conscious decisions in the design of the chart. Though not at all necessary for a small or single user instance, my chart breaks out all of the current Sidekiq queues into separate processes. This layout ensures the hard work of separating the processes out is done and the rest is a matter of scaling and tuning.

As of this writing, my helm chart also installs a weekly cronjob to clean up media files and, optionally, a cronjob for backing up the database to some shared storage in your Kubernetes cluster. Though it is ultimately incomplete, I feel the helm chart is a good start.

As for actually running Mastodon for myself I created a subdomain for my instance to live at. I then installed Mastodon, using my helm chart, into my k3s cluster. Ignoring the cost of my ISP and the computers I have, running Mastodon is quite minimal. My home lab provides everything I need to make Mastodon work including persistent storage using TrueNAS. For media storage, I created a Cloudflare R2 bucket and URL for public access. Mastodon is configured to send media content to R2 which is then served from the CDN URL. This keeps all of the heavy storage separate from the rest of the system. My last bill for R2 was just $0.06 which was for the approximately 20GB of content I have stored there. I do expect my next bill to be more because the average amount of data stored in R2 will be higher.

Since my installation is just a private one, I installed PostgreSQL and Redis as single instances within my k3s cluster. Both instances are extremely basic Bitnami based installed using their available helm charts. PostgreSQL is backed by persistent storage provided by TrueNAS. For email, my k3s cluster runs an installation of Postfix. Postfix is configured to send email through Send In Blue and services that I run in my cluster are configured to talk to Postfix. This allows me to have a single mail relay that I need to maintain the configuration for.

Ingress is provided by Cloudflare and cloudflared tunnels. A tunnel is configured on a different VM I have running and then configured in the Cloudfare side on how to route traffic to the Kube cluster with the correct hostname included.

All said, this setup has proven reliable for me since mid December. In a future post I’ll discuss how I got my private instance to feel a bit more included in the Fediverse by adding relays. Please leave a comment if you feel I missed something or got something wrong.

Quick tip on a rather specific situation I found myself in though I believe it could come up for a lot of people using WordPress trying to integrate with ActivityPub networks. If you are:

  • Running WordPress
  • Using a page caching solution like Cloudflare APO or manually configured
  • Running an ActivityPub plugin and/or webfinger

Then you will likely run into an issue with your site not being reliably discoverable when searched for. Using Matthias Pfefferle‘s ActivityPub, Webfinger and Nodeinfo plugins to get your WordPress site exposed as an ActivityPub server will add a few routes to your site. One of the routes is the author pages of WordPress which exist at /author/<author username>. However, this path when hit with a browser will return HTML. ActivityPub instances on the other hand will be looking for a different content type called application/activity+json. Unfortunately, many caching layers will not provide a Vary on Accept which you will need in order to return different data depending on what type of content the requester is looking for.

To resolve this on my site, which uses Cloudflare for CDN, I added a page rule that disallows caching for my author page. This works because I am the only author on the site. A full “proper” solution would be to set a Vary on the Accept header for that path, which Cloudflare does not support.

You may want to be very specific about what Vary headers are used, on what paths and what you actually accept a Vary header on and so on. Allowing for a wide or unlimited range of values can result in people easily breaking cache at the CDN sending requests to your origin servers.

One of the requirements when setting up a Mastodon instance is that you are able to send outgoing email. If you are running a personal instance you easily get away with running something like Mailhog which will simply capture all emails being sent and present it to you in a nice web interface. While setting up my personal Mastodon instance I decided to setup a real smarthost/relay for my k3s cluster. I did this using Postfix configured to route mail through a smarthost. Search the web for details on how to do this, there are a lot of how-tos out there explaining the process if you are not familiar with it.

In the past I would have used my gmail account as my smtp relay. Earlier in 2022, Gmail removed the ability to do this so I needed to find a replacement. I ended up settling on https://www.sendinblue.com because they offer a free tier that allows for 300 emails per day. Since everything I do in my cluster is personal there is no way I’ll ever hit that limit. Even if I were to hit the limit I don’t mind if the email messages simply stop working until the next day. I found setup to be easy. Simply create an account (giving them a bit of information) and then visiting the SMTP & API page, clicking SMTP and getting my credentials to put into Postfix.

SendInBlue SMTP/API interface

I am not affiliated SendInBlue in any way, just sharing something I found that allows you to quickly setup an SMTP relay for free.

In this post I’m going to go over some of the things I have picked up about Mastodon over the past few weeks. Mastodon is better described right from the source but in very basic terms, it is a sort of distributed, better known as “federated“, Twitter like system comprised of any number of hosts communicating together using a standard set of protocols. Users of Mastodon exist on separate installations called instances that each have their own core topic or target audience. For example, I am currently on https://fosstodon.org which is focused on bringing people interested in Fee Open Source Software together. Being on an instance does not mean you are only able to interact with people on that instance or go off topic. No, every instance (unless blocked by the instance admin, more on that later) is connected to other instances by way of users following each other. What this means is if I follow someone on a different instance, the instance I am on becomes aware of it and will begin to draw in posts form that instance. In a way, the more people cross follow each other across instances the stronger the bond and the more data flows across all of them.

Larger instances with a lot of users will have the most diverse feeds available to you as the user. So there is a certain amount of advantage to being part of a large community as the pool of potential people you can interact with is naturally larger. As each instance has multiple feeds, consisting of your local feed of people you have chosen to follow, the local feed consisting of everyone on your instance and the federated feed containing everything the server has discovered from its users, you can change your social media experience on the fly. In addition to the multiple feeds, you have powerful self moderation tools including the ones you would expect like being able to mute or outright block users but you can also block entire instances with a couple of clicks. Just not into people posting Waifu stuff? Block entire instances dedicated to that material. Even though it may not violate any acceptable use policies you are able to quickly block entire types of content from your feed.

The most recent release of Mastodon allows you to follow hashtags allowing you to easily follow topics you like, so long as users tag their posts properly. This is an extra layer of awesomeness that is the Mastodon system. Which brings me to one of my last points about using Mastodon, there is no “algorithm” pushing content towards you. Gone are posts that rise to the top because someone paid money to put it there. No more toxic, hot take garbage from bots filling your feed and drowning what you’re really looking for.

Owners of Mastodon instances are encouraged to commit to the Mastodon Server Covenant. This covenant is an agreement to certain terms in an effort to give users confidence in the Mastodon network and the instances they join. An instance that commits to the Mastodon Server Covenant agree to, among other things, moderate content, backup the service and provide users with at least a three month warning prior to stopping services. Committing to this covenant is optional but in exchange the instance will be listed as having committed to the covenant giving them much better visibility to potential new users than instances that haven’t.

Moving on to the more technical, behind the scenes side of Mastodon, is just as interesting. The most well known and visible portion of Mastodon is called ActivityPub. ActivityPub is not unique to Mastodon, in fact it can be implemented by any number of systems and indeed there are a number of federated services that use it. ActivityPub is the portion that pushes content around between users and other instances. There is even a WordPress plugin, which this site uses, to allow people to subscribe to a feed of my blog posts. The additional services using ActivityPub are beyond the scope of this post.

Unlike Twitter, you can host your own Mastodon instance using the code available at https://github.com/mastodon/mastodon by following the directions at https://docs.joinmastodon.org/admin/prerequisites/. While I have no interest in hosting my own instance long term for a variety of reasons, I did want to understand how the software works as a whole and what it took to host and scale it. As you can imagine, hosting a large instance is definitely a technical challenge let alone the challenges of cost and moderation.

In an effort to learn how to run Mastodon, I created my own Helm chart available at https://github.com/dustinrue/mastodon-helm-chart. My helm chart is functional but really only for a specific setup and is not currently ready for wide use. However, what it taught me was a lot about the moving parts that make up a full Mastodon instance. Designed to be highly scaleable, Mastodon requires just two external services (ignoring file asset storage) including Redis and PostgreSQL. Redis is used for caching various pieces of data while PostgreSQL of course stores data that must persist including user accounts, their settings, posts and so on. You do also provide storage and this can be done using local storage or object storage like S3. Mastodon itself is shipped with everything else you need which consists of Sidekiq with various queues, a web socket based streaming application an a web app. The web app is what users see when they access your instance, the streaming portion feeds data to your browser as it comes in and Sidekiq handles a bunch of different background tasks including shipping your posts to subscribed instances, ingesting updates from other instances, getting images and videos ready (and pushed into S3 if you are using that). All of the Sidekiq queues can be broken out into individual processes (which is absolutely necessary for large installations) so that more work can be done in parallel. It is very clear that the designers of Mastodon have considered each aspect of hosting a large installation and taken care to ensure it is possible. In fact, there is a sort of “brain dump” style of “this is what it takes to scale Mastodon” from one of the primary stakeholders of the project at https://gist.github.com/Gargron/aa9341a49dc91d5a721019d9e0c9fd11.

In my short time with Mastodon, it has become one of the top three most exciting pieces of technology I have interacted with in my career, the other two being Linux and Kubernetes. The fact that I can run Mastodon on the other two makes it even better. Mastodon, and the protocols that power it, are the real “web 3.0” because it gives power back to the users. Come to think of it, Mastodon is like web 1.0 where its users hold the power and are in control. It was because of the Twitter shakeup that I discovered Mastodon and I hope that the current social media climate continues to bring greater awareness to the Mastodon network and it is able to continue growing. You can find me on fosstodon.org as @[email protected].

For a number of years I have self-hosted a few things out of my house. This has always meant that I need a way to allow public access to resources hosted on my home lab. In the past this has meant having a single system on my network that could act as a sort of gateway to everything else. This system runs Nginx and a number of vhost configurations to route traffic to the correct VM running whatever it is I’m looking for.

For this to work, I have to insert port forwards into my router so that traffic destined for port 80 or 443 is forwarded to the Nginx proxy. In addition to this, I have to run a script on the proxy that checks my current public IP address and if it has changed, update a DNS record within Cloudflare. This has served me well for years but I have always wondered if there was another option.

As it turns out, there is and it is called Cloudflare Tunnels. As someone who has used Cloudflare for years as a free CDN in front of my blog, I was super happy when Cloudflare made most of their Zero Trust functionality free for small users. Their Zero Trust platform consists of a number of elements but today I’m going to concentrate on just the Tunnel piece.

With the sudden increase in interest in Mastodon as a social media platform I decided to play around with the software and running it myself. Even though I don’t plan on running it on my own any time soon and am totally happy throwing money at some instance admins (which you should consider doing https://hub.fosstodon.org/support/), I thought it would be a fun exercise. Anyway, once I had the software running I needed a way to get it accessible to the public. This is where I turned to Cloudflare Tunnels.

Of course, for any of this to work you will need a Cloudflare account with a domain configured (which is free…and I am in no way connected with Cloudflare other than I am a customer). A Cloudflare tunnel works using an agent running on a host inside of your internal network that is then authenticated with your Cloudflare account. Creating the tunnel is simple:

  • Sign into your Cloudflare account
  • Click Zero Trust
  • Access and then Tunnels
  • Click the Create Tunnel button
  • Give the tunnel a name and click Save
  • Choose your operating system from the list and then paste in the commands you see. If you are using a Raspberry Pi you may need to get the latest release from https://github.com/cloudflare/cloudflared/releases. Once installed use the second command for if you have an existing installation of cloudflared. Advanced users can simply add the tunnel themselves.
  • Once cloudflared is running on your system it will show up as connected
  • Click Next

On the next screen you will be given the option to connect a hostname to the tunnel. For this post I will describe how I setup access to my mastodon.dustinrue.com instance. You will be presented with the following screen:

For my mastodon.dustinrue.com instance, I entered mastodon as the subdomain and selected my dustinrue.com domain. In the service section I selected https and gave it the IP address of my internal k3s system. My final config looked similar to this:
I use HTTPS because my internal k3s system’s ingress controller uses cert-manager to create certificates. From here I needed to add some additional application settings to ensure everything worked correctly. Note: you don’t want to use an existing subdomain here (unless you really know what you are doing) because Cloudflare is going to want to insert a new DNS record to make the tunnel work.

Since I am using an SSL service type, I need to specify the name to send as part of the request so that the ingress controller knows what resources is being accessed. Also, although I do use cert-manager I didn’t setup a TLS record for cert-manager to use so it just applied a self-signed cert. This is fine in this case because the public will see the certificate that Cloudflare provides, not what my k3s cluster has. For these reasons, my TLS section is configured like this:

The Origin Server Name and No TLS Verify are the important options.

In addition to the TLS settings, the regular HTTP section also needs some attention. For this, my settings look like this:

From here, click Save. Cloudflare will insert the correct DNS record for your domain and the connection from the public to your resource will be made. If everything is configured correctly then you will be able to access your resource at the subdomain you provided. Remember that all of the same rules apply here, everything in the path needs to be aware of whatever vhost you are using. The trick here is that there are no port forwards in your router and there is a protected path between Cloudflare into your home network, your home network remains unexposed to the public.

I hope this quick guide is enough to get you going on using Cloudflare tunnels. In a future post I will describe how to use the same system but for SSH connections. This is a powerful tool when combined with Cloudflare Zero Trust because it allows you to define who is allowed to access systems. Zero Trust can also be used to protect specific routes on a site (or the entire site) if you want. For my blog, I use Zero Trust to protect the admin and login pages.

In a previous post I quickly mentioned that this site now has pfefferle’s ActivityPub plugin installed. This plugin implements enough of the ActivityPub and associated protocols to allow a WordPress site to look and behave a bit like a user on an ActivityPub compatible platform including Mastodon and more. By installing the plugin, you can search for an author of a site and then follow them so you can see a stream of their content whenever they post it. From there you can comment on the post and interact with it from within your favorite Fediverse platform.

In this post I quickly describe how to get started with the plugin. To start, install the plugin (https://wordpress.org/plugins/activitypub/) using your usual method for installing plugins. For me, that means adding it to a composer.json file, for you it might mean simply searching for the plugin in your WordPress admin -> plugins screen. Once installed, activate the plugin. That’s it! Your site is now ready to be followed by anyone within the Fediverse network.

The plugin implements the bare minimum required, it seems, so it can be a bit confusing when there are no immediately obvious visual changes to anything. Most of what the plugin does is in the background, inserting routes that are necessary to make the webfinger and ActivityPub protocols work on your site. Don’t worry though, the plugin is working!

To get the search string people need to use to follow your blog posts or pages visit your user profile page. You should see something similar to this near the bottom of the page:

These profile identifiers can be pasted into the search bar of an instance and from there you can follow the author. Simply take the @ruedu portion that you see and paste it into the search bar of your Mastodon instance. For simplicity, I put this into my Fosstodon profile https://fosstodon.org/@ruedu. This allows people to easily see my profile.

This final step was not immediately clear to me but I found this in my profile it was super easy to then follow myself. Your followers will appear in Users -> Followers. Anyone that replies to a post on the Fediverse will be added as a comment on your site. On my setup, using Akismet, incoming comments were put into spam for some reason.

I have installed this plugin https://wordpress.org/plugins/activitypub/ and activated it which means you can now follow my blog as if it were any other user on the Fediverse network. Pasting @ruedu into the search bar of your favorite Mastadon (and more) instance will allow you to see posts when I publish them. I will soon stop posting directly on my profile whenever I post content in favor of letting people choose when to get spammed with my content.