Sometimes you need to run or build containers on a different architecture than you are using natively. While you can tap into buildx for building containers, running containers built for a different architecture other than yours requires Docker Desktop with its magic or the image itself needs to have been built in a specific way. This rarely happens.

Using Colima’s built in CPU architecture emulation it is possible to create a Colima instance, or profile, for either arm64 (aarch64) or amd64 (x86_64) on both types of Mac, the M series or an Intel series. This means M series Macs can run x86_64 containers and Intel Macs can run arm64 based images and the containers won’t be aware that they aren’t running on native hardware. Containers running under emulation will run more slowly than they would if run on native hardware but having the ability to run them at all is really useful at times.

Here is what you do to setup a Colima profile running a different CPU architecture. I’m starting with an M1 based system with no Colima profiles created. You can see the current profiles by running colima list.

colima list
WARN[0000] No instance found. Run colima start to create an instance.
PROFILE STATUS ARCH CPUS MEMORY DISK RUNTIME ADDRESS

From here I can create a new profile and tell it to emulate x86_64 using colima start --profile amd64 -a x86_64 -c 4 -m 6. This command will create a Colima profile called “amd64” using architecture x86_64, 4 CPU cores and 6GB of memory. This Colima profile will take some time to start and will not have Kubernetes enabled. Give this some time to start up and then check your available Docker contexts using docker context ls. You will get output similar to this:

docker context ls
NAME TYPE DESCRIPTION DOCKER ENDPOINT KUBERNETES ENDPOINT ORCHESTRATOR
colima-amd64 * moby colima [profile=amd64] unix:///Users/dustin/.colima/amd64/docker.sock
default moby Current DOCKER_HOST based configuration unix:///var/run/docker.sock

From here I can run a container. I’ll start with alpine container by running docker run --rm -ti alpine uname -a to check what architecture it is running under. You should get this in return if you are on an M series Mac – Linux 526bf44161d6 5.15.68-0-virt #1-Alpine SMP Fri, 16 Sep 2022 06:29:31 +0000 x86_64 Linux. Of course, you can run any container you need that is maybe x86_64 only.

Next I am going to run Nginx as an x86_64 container by running docker run --rm -tid -p 80:80 --name nginx_amd64 nginx. Once Nginx is running I will demonstrate how to connect to it from another container running on a different architecture. This is super useful if you are testing different pieces of software together but one isn’t available natively for your platform.

Now I’ll create a native instance of Colima using colima start --profile arm64 -c 4 -m 6. When this completes, docker context ls will now show a new context that it has switched to. Running docker ps will also show there is nothing running. You can switch between contexts using docker context use followed by the name of the context you want to use.

With the new context available I will start a copy of Alpine Linux again and add the curl package using apk add curl. With curl available, running curl host.docker.internal will show a response from Nginx!

Now that I am done testing I can remove the emulated profile using colima delete amd64 and the profile will be removed and cleaned up. Easy.
For the past few years I have been using Kubernetes to host a number of services including custom code, WordPress and all manner of other publicly available projects. In this time I have come to rely on a few, what I call, base services that make the experience of running software in Kubernetes just a bit nicer. In this post I’m going to go through what base services I install and a bit on why.

All of the services listed below are installed using helm. I consider Helm the only method for managing applications running in a Kubernetes cluster. Nothing else is able to manage software as well as helm. If a service I want to run in Kubernetes doesn’t have a helm chart I will create one for it.

Almost every Kubernetes setup I use needs to actually service requests from users and this is almost always done using the Ingress system. My preferred ingress controller is the community maintained ingress-nginx. Do not confuse this controller with nginx-ingress, which is put out by nginx.com. I prefer this fully open source controller for its straight forward feature set and configuration system. It has a large number of features and works equally well in both home lab and cloud environments. As an Nginx user anyway I find the configuration very familiar. To install ingress-nginx, I add their repo using helm repo add ingress-nginx https://kubernetes.github.io/ingress-nginx. You will find additional information at https://kubernetes.github.io/ingress-nginx/deploy/.

SSL is all but a necessity these days and I have found no better way than to use cert-manager in the cluster. Nearly all of my use cases allow for the usage of a cluster wide, DNS based resolver that allows me to get SSL certs for resources that are not yet publicly accessible or are internal only. By leveraging DNS services from AWS or Cloudflare (or any supported DNS provider) I am able to automatically create and update certificates with very little intervention. To install cert-manager I use the the official helm chart provided by the project using helm repo add jetstack https://charts.jetstack.io. Additional installation directions are available at https://cert-manager.io/docs/installation/helm/.

Speaking of DNS, in clusters where I need to have DNS records pointed towards the cluster I use external-dns. This service looks for ingress entries and manages records in your DNS provider pointing the desired hostname towards your cluster or its external load balancer. I install external-dns using the helm chart by Bitnami. Learn more at https://github.com/bitnami/charts.

Getting logs out of a production cluster is important and assuming you have some place to accept the logs, you won’t generally do better than using fluent-bit. Installation and configuration of fluent-bit is highly dependent on what your logging system is so I recommend reading their documentation on how to get going. Fluent-bit is quite popular and it is usually easy to find examples for whatever your logging system is.

Used by a number of other services, metrics-server gathers basic utilization data from pods and nodes in your cluster. This service is so essential many small Kubernetes systems, like k3s, automatically install this service. I install this service again using Bitnami’s charts available at https://github.com/bitnami/charts.

For managed Kubernetes instances in public clouds I find cluster-autoscaler to be an essential service. When configured correctly, and when combined with metrics-server and properly configured resource settings, cluster-autoscaler will automatically add and remove worker nodes. Information about how to add the cluster-autoscaler helm chart can be found at https://github.com/kubernetes/autoscaler/tree/master/charts/cluster-autoscaler.

These services make Kubernetes much easier and automatic and for that reason I find them to be essential in almost every cluster. What services do you find essential?

If you find yourself in the business of creating and testing Helm charts, or you simply want to try one out, then Colima with its built in Kubernetes functionality may be for you. In this post I am going to walk through how to quickly get going with Colima’s Kubernetes integration and an ingress controller for basic Helm chart testing.

I assume you already have Colima and Helm installed and are familiar with the tools and Kubernetes itself. If this is you then continue reading!

For this post I am using Colima 0.4.4, k3s v1.23.6+k3s1, helm 3.9.3 and ingress-nginx 4.2.0. I often find myself creating Helm charts and I want to test my modifications locally before committing my changes. Once in a while I also want to quickly test an available helm chart without messing up an existing Kubernetes installation. In these cases I will create a Colima instance with Kubernetes enabled and install my preferred ingress controller, nginx-ingress.

To get started, ensure that no other colima instances are running using colima list followed by a colima stop <name of profile> for any running instances. You should also ensure that there are no other services running on your system that are opening ports, especially 80, 443 and 3306. This helps ensure your test instance doesn’t interfere with any existing colima instances or other services. Then, issue colima start helm-test --kubernetes -m4 to start a colima instance with 4GB memory and Kubernetes enabled. Once colima has finished creating the instance you can add the ingress-nginx helm repository if you don’t already have it with helm repo add ingress-nginx https://kubernetes.github.io/ingress-nginx followed by helm repo update. You can now install ingress-nginx using helm install -n ingress-nginx --create-namespace --set controller.ingressClassResource.default=true ingress-nginx ingress-nginx/ingress-nginx. This command will install ingress-nginx and set it as the default ingress class for the cluster. At this point you have basic installation of Kubernetes with an ingress controller which will allow you to test most Helm charts.

As a test, you could now create a brand new helm chart with helm create nginx. Edit the resulting values.yaml file and enable ingress then install the chart into your new test cluster. You should see that it is able to download and install the default nginx image and create the proper ingress rule automatically. For my test I used helm install -n default nginx .. Before long you should see this as an ingress record:

kubectl get ingress nginx
NAME    CLASS   HOSTS                 ADDRESS        PORTS   AGE
nginx   nginx   chart-example.local   192.168.5.15   80      54s

Despite what the Address column says, the chart is now available at 127.0.0.1. Create a hosts entry and you will be able to get the default nginx page.

Of course, you can use or test other charts too. Here I will install bitnami’s MySQL chart with the following settings in a yaml file

## MySQL Authentication parameters
##
auth:
  ## MySQL root password
  ## ref: https://github.com/bitnami/bitnami-docker-mysql#setting-the-root-password-on-first-run
  ##
  rootPassword: "password"
  ## MySQL custom user and database
  ## ref: https://github.com/bitnami/bitnami-docker-mysql/blob/master/README.md#creating-a-database-on-first-run
  ## ref: https://github.com/bitnami/bitnami-docker-mysql/blob/master/README.md#creating-a-database-user-on-first-run
  ##
  database: "blog"
  username: "wordpress"
  password: "password"
##
primary:
  persistence:
    ## If true, use a Persistent Volume Claim, If false, use emptyDir
    ##
    enabled: false
  service:
    ## @param primary.service.type MySQL Primary K8s service type
    ##
    type: LoadBalancer
##
secondary:
  ## Number of MySQL Secondary replicas to deploy
  ##
  replicaCount: 0

I install the bitnami repo using helm repo add https://charts.bitnami.com/bitnami followed by helm repo update to ensure I have the latest info. To install a copy of MySQL with my settings file I use helm install -f mysql.yaml mysql bitnami/mysql. After a short while MySQL will be installed and also available on localhost through k3s’ built in LoadBalancer system. Notice in the mysql.yml file I specified I asked the chart to install the primary instance of MySQL with a LoadBalancer based service instead of the default ClusterIP.

When you are finished testing a simple colima delete helm-test will remove your testing environment and free up resources.

Hopefully you see now how quickly and easily you can get going with Colima and its Kubernetes integration to get a local Kubernetes cluster up and running for testing. The Kubernetes integration Colima uses is very capable and well suited to learning and testing. Enjoy!

Semi-related to my previous post, this post quickly touches on the fact that having swap on your system is not always a bad thing. I have seen “disable swap” become a common “performance hack” suggested by a lot of people and it appears to be growing in popularity. I believe a lot of people are simply parroting something they heard once but don’t actually know when it makes sense to disable swap on a system. I have found that outright disabling swap has a detrimental effect on system performance.

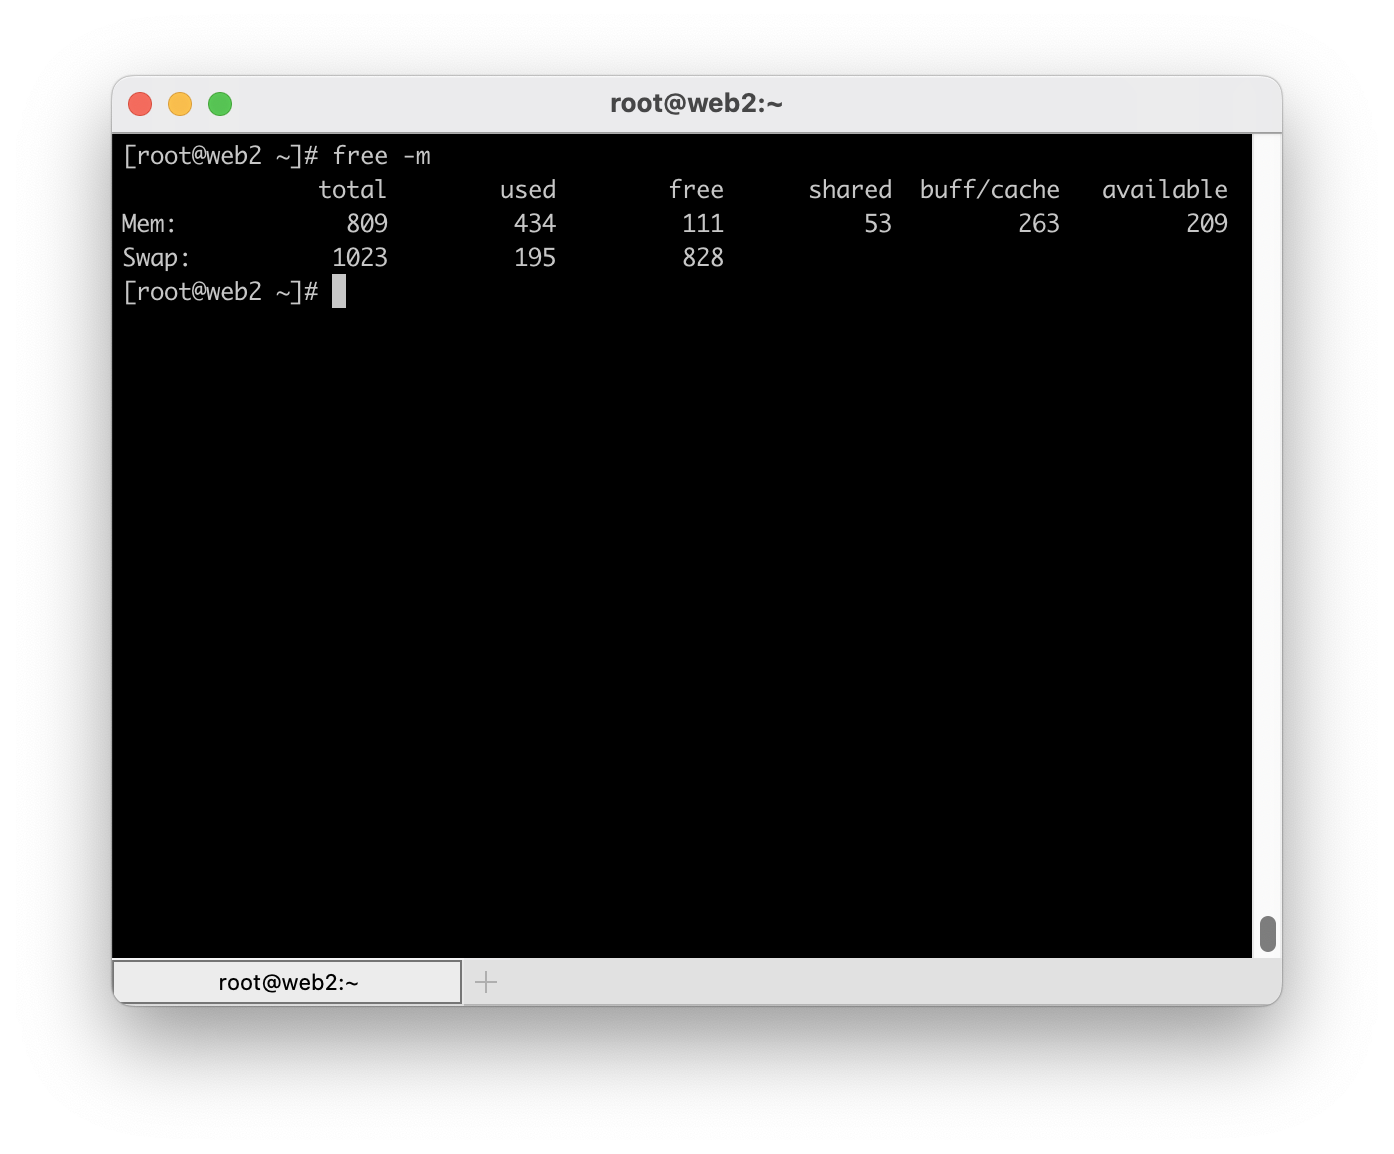
The basic idea behind not using swap is sound, on the surface. The argument is that swap is both much much slower than system memory and that if you are hitting swap then you need more memory. To add to this, a lot of people don’t understand how memory works on Linux (and indeed all major operating systems). Linux wants to use as much memory as possible. If you give it 1TB of memory (or more) then it will do everything it can to eventually use all of it. However, how it uses this memory can be confusing. Looking at this output from free -m, it may not be obvious what is happening:

[root@web2 system]# free -m
              total        used        free      shared  buff/cache   available
Mem:            809         407         137          37         263         251
Swap:          1023         282         741

In the above example output from free -m you will see the columns total, used, free, shared, buff/cache and available. The values for each, respectively is 809, 407, 137, 37, 263 and 251.

In a lot of cases, the value most people will look at is “free.” Unfortunately, on a system that has been running for some time, this value will almost always give the impression that the system is low on memory. Like so many things, there is a lot more to it than what the free value shows. In reality, the value you want to pay attention to is available. This value represents the amount of free memory with memory that can be reclaimed at any time for other purposes added in. The “cache” portion of the buff/cache value is what can be reclaimed and it represents the amount of data from disks that is cached into memory. It is this cache that operating systems try to keep full in order to avoid expensive disk reads and is why a system with a lot of memory can potentially have very little free memory.

A system that is low in available memory will also not be able to cache a lot of disk reads (because remember that available is free+cache added together) which will lead to lower overall performance. Of course, loading an entire disk into memory won’t necessarily have a positive affect on overall performance either. If a file is read once and never used again, does it really need to be cached? Having a lot of memory can lead to things being needlessly cached. A system with 16GB of memory can perform just as well as a system with 32GB of memory if most of the 32GB memory is filled with files that are very rarely read again.

Getting to why having swap is not evil, some apps and portions of apps aren’t always being used, even if they are running. For this reason, having swap available on a system is beneficial because the operating system can page application memory to disk and free up memory for to use as a disk cache for more active applications. In instances, such as the web server hosting this site, having swap available is a necessity because it allows me to have a system with less memory while still maintaining proper performance in normal conditions. Services that are necessary but rarely used are swapped out leaving room in memory for application code to be kept there instead. WordPress is considered “hot data” where as systemd is not. Once the system has booted systemd, while necessary, is not actively doing anything and can be paged to disk without affecting performance in noticeable way. However, swap is an issue if you are dipping into it continuously. This will quickly become evident if you have a lack of available memory as well as a high usage of swap. In this case, you truly do need more memory in the system.

I hope this post helps clear up some of the confusion around memory usage on systems. Have anything to share? Did I get something wrong? Leave a comment!

In a previous post I mentioned that this site is hosted across two different hosts. One that is dedicated to running MySQL and Redis while the other runs Nginx and PHP. I use this arrangement for a few reasons. First, this is the cheapest way to get two real CPU cores on Digital Ocean. During a web request, multiple processes including Nginx, PHP, MySQL and Redis must run and share CPU time with each other. By using multiple machines, the work is spread across multiple physical CPUs which improves overall performance and throughput. Second, it allows me to configure MySQL to use most of the system memory without fear that it’ll be OOM killed. An OOM kill is what happens on a Linux system when it determines it is out of memory and the biggest user of memory needs to be removed (killed) in order to protect the system from a meltdown. In general, regular triggering of the OOM killer should be considered an error in configuration and capacity planning but know that it is there to protect the system.

In this post, I want to discuss a scenario where you want to host a common LAMP/LEMP stack on a single machine. In this kind of setup, multiple processes will be competing with each other for resources. Without getting too into the weeds about tuning software on this kind of setup, I’m going to assume that you will likely configure MySQL in such a way that it, as a single process, will consume the most memory of any process on the system. Indeed, most distributions when installing MySQL (or MariaDB) will have a default configuration that allows MySQL to use in excess of 1GB.

Unlike MySQL, the amount of memory that many other processes may use is relatively unknown. Looking at just PHP (using php-fpm) the amount of memory is fairly dynamic. It is unlikely that you will be able to tune your system to ensure PHP doesn’t use too much memory without sacrificing total throughput. Therefore, it is necessary to configure PHP in such a way that you over provision available memory in an effort to ensure you get the most performance you can most of the time. However, in this scenario it is likely that you will eventually face a situation where PHP is asking for a lot more memory than usual and the system will invoke the OOM killer to deal with the sudden shortage of memory. MySQL, being the single largest user of memory on the system, will almost always be selected by the kernel to be removed. Allowing MySQL to be OOM killed is far less ideal than killing a rogue PHP process or two because it will disrupt all requests rather than the problem requests. So, how do you avoid MySQL being selected?

Most modern systems ship with systemd. Portions of systemd are not well received but, at least in my opinion, the init system is excellent. Using systemd, we are able to customize the startup routines for MySQL (almost any service, actually) so that we can instruct the kernel’s OOM killer to select a different process when the system is low on memory. Here is how it is done:

  • Create a directory – /etc/systemd/system/mysql.service.d. The directory name must match an existing service. For MariaDB it would be mariadb.service.d. You can determine the name by running systemctl list-unit-files
  • In this directory, create a file called oomadjust.conf with the following in it:
    [Service]
    OOMScoreAdjust=-500
  • Run systemctl daemon-reload
  • Restart MySQL

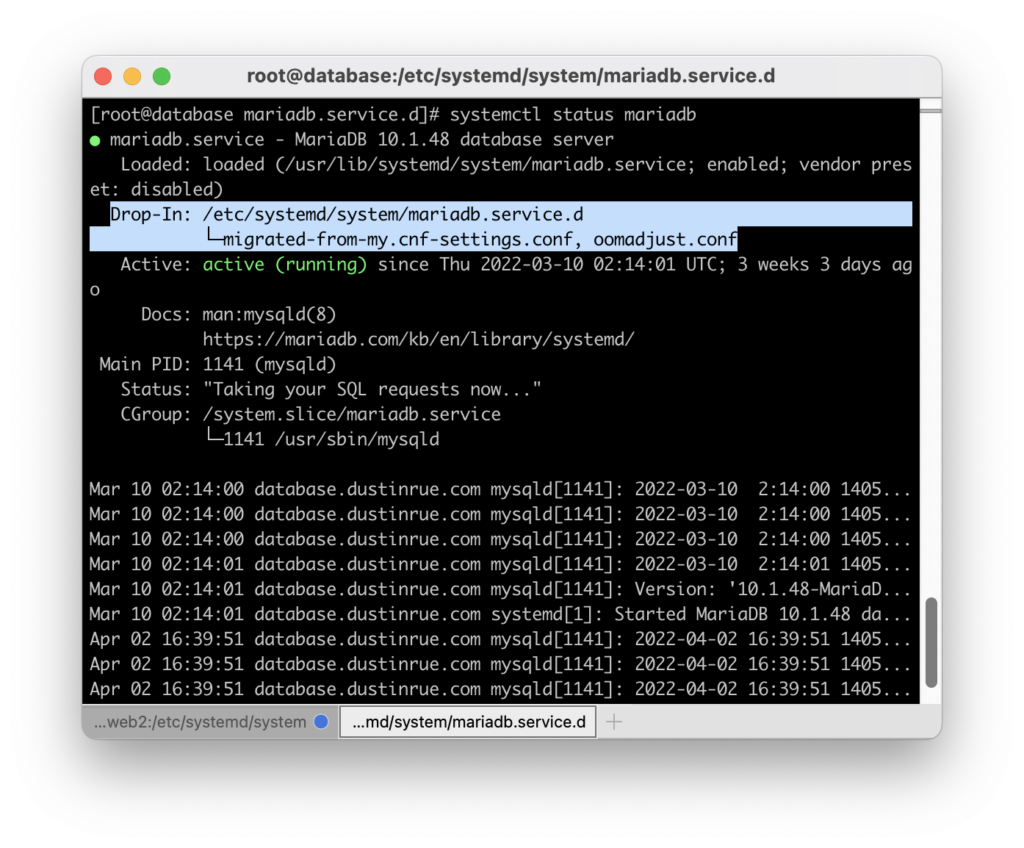
To confirm your customization was picked up run systemctl status mysql. In the “Drop-In” section you should see your customization was picked up. It’ll look similar to this:

Screenshot showing the oomadjust.conf file was picked up by systemd

This setting adjusts the value the OOM killer will calculate when trying to determine what process is using the most memory. By forcing this value to be lowered for MySQL it is much less likely to be selected. Instead, a problem PHP process will likely be selected first and removed. This will save MySQL and the overall availability of your app. Of course, your mileage may vary and you will need to tune your configuration to reduce if not eliminate the need for the OOM killer.

If you would like to learn more about systemd drop-ins take a look at the documentation by flatcar Linux at https://www.flatcar.org/docs/latest/setup/systemd/drop-in-units/. Many things can be overridden without having to edit files provided by packages (which you should avoid).

Have you used systemd’s drop-in system before? Curious how else you might use it? Leave a comment!

CentOS 7 is now in full maintenance mode until 2024. This means it won’t get any updates except security fixes and some mission critical bugs. In addition to being in full maintenance mode, the OS is simply beginning to show its age. It’s still a great OS, just that a lot of packages are very far behind “state of the art.” Packages like git, bash and even the kernel are missing some features that I prefer to have available. With that in mind, and an abundance of time on a Saturday, I decided to upgrade the underlying operating system hosting the site.

The choice of what operating system was not as simple as it was just a year ago. In the past I would have simply spun up the next release of CentOS, which is based off of Red Hat Enterprise Linux, and configured it for whatever duty it was to perform. However, Red Hat had a different idea and decided to make CentOS 8 a rolling release that RHEL is based off of, rather than CentOS being a rebadged clone of RHEL. The history of CentOS is a surprisingly complex and you can read about it at https://en.wikipedia.org/wiki/CentOS.

Since the change, at least a few options are now available to give people, like me, access to a Linux distribution they know and can trust. Among those, Rocky Linux appears to be getting enough traction for me to adopt it as my next Linux distribution. My needs for Linux are pretty basic and more than anything I just want to know that I can install updates without issue and keep the system going for a number of years before I have to worry about it. Rocky Linux gives me that just like CentOS did before. As of this writing, the web server hosting this site is now running Rocky Linux 8 and I’ll upgrade the database server at a later time. So far it has proven to be identical to RHEL and very familiar to anyone who has used RHEL/CentOS in the past.

If you are in the business of creating software, no matter your role, then you owe it to yourself to take a consider David Farley’s Modern Software Engineering: Doing What Works to Build Better Software Faster. I’m not in any way affiliated with the offer and I’m not getting any sort of kickback on that link. I just think it’s a good book.

This book, along with what I consider a sort of companion to it Accelerate: The Science of Lean Software and DevOps: Building and Scaling High Performing Technology Organizations will likely get you to rethink how you are approaching software development. The Accelerate book provides information backed by data that shows that the processes defined in Modern Software Engineering do in fact work to improve the pace of software development, the quality of the software and improvements in developer/employee satisfaction.

The overarching message to take away from the books is that being fast is the key. The quicker you can write and release code into production so that you can then get feedback from it the better your code quality will ultimately be. Care should be taken to remove anything that prevents developers from getting their code into production quickly and with minimal roadblocks. This doesn’t mean you are careless, however! Putting a heavy emphasis on testing, the books paint a picture of the ideal system where tests are written first and then code to satisfy the tests. This process helps ensure that your code is divided up into parts that can be tested easily which will, in essence, indirectly force you to write better, more readable and more easily understood code. These tests then have the additional benefit of allowing developers to know that the changes they made either satisfy requirements or at least didn’t break existing functionality. The difference between “I think it works” and “I know it works” pays huge dividends in developer and team satisfaction. It also provides long term benefits as people are rotated out of teams because it codifies intended behavior. Well written and described tests, when they fail, will tell the developer what the intended outcome of a function is.

This may feel counter-intuitive but the Accelerate book does a great job of showing, with data, that these things are in fact true in most if not all cases. While reading the book there were a number of times where I stopped to consider how I was approaching things and realized some of the assumptions I had made were incorrect and need to be adjusted. Much of what Farley describes sounds difficult to implement and indeed everything he describes does require a certain amount of discipline amongst the team to ensure the work they do enforces the defined ideals.

If you’re looking for a good read that will make you think about how you are approaching software development, regardless of your role in it, I highly recommend Modern Software Engineering as well as Accelerate book.

You sign into Facebook and you see some new friend notifications from people you know you are already friends with. You browse your feed and you see notes from the same people saying “don’t accept the friend request from me my account was hacked!” What’s actually happening here? Was their account hacked in the traditional sense? Why would someone do this? How can I avoid this happening to me?

To get into this we must first properly define what is happening in these cases. What a lot of people describe as “being hacked” isn’t quite right. Being hacked means someone actually broke into your account and you have now lost control of it. This would happen because you had a weak password on your account and you’re not using two factor authentication. I’ll discuss what this means further down. Most of the time what you’re seeing is known as “account cloning” where an attacker has take the publicly available information on your account and create a replica Facebook account and then try getting people to add them as their friend. You can read more about account cloning at https://connections.oasisnet.org/facebook-account-cloning-scam-what-to-do-when-you-get-a-friend-request-from-a-friend/.

Securing your account password

Ok, with some small clarifications out of the way let’s talk about what you can do to help prevent both types of attacks. Let’s start with preventing people from taking over account by guessing your password.

An important first step is to have a strong password. Passwords that contain symbols, differences in capitalization and numbers are stronger than those that don’t. You should avoid using common names and words as these are easily guessed using robotic tools that just continuously try combinations of words until it finds one that works. Once this happens, an attacker can easily take over an account and prevent you from ever getting it back. So, the first tip is to have a strong password that you don’t use anywhere else. You can change your password on Facebook at https://www.facebook.com/settings?tab=security by visiting the page and then clicking Edit for your password. What I find helps a lot is using the built in password saving feature of my browser so that I have a single password to unlock my browser which can then fill in passwords for the sites I visit.

The second tip that is equally, if not more, important is to use two factor authentication. This way, even if an attacker does guess your password they will, hopefully, not have access to your second factor of authentication which will typically be your phone. You can configure two factor authentication at https://www.facebook.com/security/2fac/settings. For simplicity I recommend having Facebook text a code to your phone number that you input into Facebook when required. For advanced users who are more comfortable with or already have an authentication app (like Google Authenticator) then using that is an even stronger choice.

Protecting yourself from account cloning

From the article (you read at least some of it right?) we know that attackers do this because they want to prey on your trust of family and friends to, usually, scam you out of money. It’s important to understand the difference between having your account taken over and your account simply being cloned.

You may not be aware of this but the default settings of Facebook allow anyone to see at least some information about you even if they are not friends with you or even signed into Facebook. Depending on how you configure your account security people can see your profile photo, background photo, some photos and your friends list. All of this is more than enough to allow an attacker to download a copy of those items and then create an account that looks just like it.

Below is what you can do to limit this type of attack. I used the website on my computer to set these settings. Many of these settings are probably available on the phone app as well but you’re on your own.

First, review your privacy settings which is located at https://www.facebook.com/privacy/checkup?source=settings. Click on “Who can see what you share” and then click continue. Scroll through the list and set each one so that it is something other than “Public.” Note that the trade off to setting these values as not public will make it harder for people to find you (even people who you might want to find you). Continue through this page, setting options as you desire.

Limiting these values go a long ways towards preventing people from getting enough information about you and creating a convincing clone of your account.

If you want to control who can post on your timeline, who can tag you and more visit https://www.facebook.com/settings?tab=timeline.

If you want to limit what people can do with your Public Posts visit https://www.facebook.com/settings?tab=followers.

The more options you set to “friends” or “friends of friends” the better.

One last thing about privacy

There is a saying that if a product does not charge then you are the product. Facebook is a tool for gathering your info and sharing it with advertisers so they can target you. Despite this, Facebook offers a decent number of controls for your privacy that you can leverage and I recommend you do that. This limits both their ability to track but also prevents account cloning. If you are an iPhone user with a newer phone (one that runs the latest versions of iOS) and use the Facebook app (or even if you don’t) I recommend visiting the settings of your phone and find Privacy. Tap this option. Find “Tracking”. On this screen you will find an option called “Allow Apps to Request to Track.” Ensure this option is disabled, like this:

These are just some of the steps you can take to help secure your account and reduce the amount of tracking of your information. There is a lot more you can do and if you’re interested then I recommend doing some searches on the web about ensuring Facebook and advertising privacy on your devices.

Jeff Geerling has been on fire the past year doing numerous Pi based projects and posting about them on his YouTube channel and blog. He was recently given the opportunity to take the next TuringPi platform, called Turing Pi 2, for a spin and post his thoughts. This new board takes the original Turing Pi and makes it a whole lot more interesting and is something I’m seriously thinking about getting to setup in my own home lab. The idea of a multi-node, low power Arm based cluster that lives on a mini ITX board is just too appealing to ignore.

The board is appealing to me because it provides just enough of everything you need to build a reasonably complete and functional Kubernetes system that is large enough to learn and demonstrate a lot of what Kubernetes has to offer. In a future post, I hope to detail a k3s based Kubernetes cluster configuration that provides enough functionality to mimic what you might build on larger platforms, like say an actual cloud provider like Digital Ocean or AWS.

Anyway, do yourself a favor and go checkout Jeff’s coverage of the Turing Pi 2 which can be found at https://www.jeffgeerling.com/blog/2021/turing-pi-2-4-raspberry-pi-nodes-on-mini-itx-board.