For some time I’ve been meaning to publicly release the custom component I’ve been using to show which if my Xbox friends are online and what they are playing. There was one issue I had with my component that kept me from releasing it however, it requires access to an API endpoint I would prefer to not offer to an unknown number of people and I’m not interested in scaling it up to sell.

What I decided to do instead is allow the service to be self hosted in the form of some add-ons for hass.io that the custom component can then talk to. The service is broken out into three parts. A part to manage an auth token, a part to basically proxy Xbox Live API requests and a part that glues to two together so the auth token can be shared. The original design was meant to scale well and easily and this is basically just a 1:1 port of the setup. 

The add-ons can be installed by adding this custom add-on URL to your add-on store on your hass.io instance – https://github.com/hassio-xbox/add-ons. Add the URL, refresh and then install the services in the following order

  • Redis Server
  • Xbox Live Credentials Manager (and then configure your username/password)
  • Xbox Live API Service

Once all services are up and running you can configure the component which is installed automatically. The component needs to be given the IP address of your hass.io instance as well as a list of gamertags to keep track of. The format looks like this:

sensor:
- platform: xru
ip: <hass.io instance ip>
gamertags:
- RealAngryMonkey
- Qwik

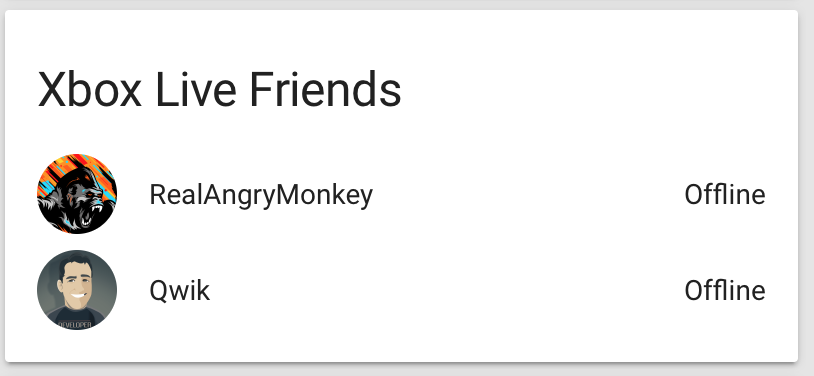
Once configured restart Home Assistant and you’ll see the status of your friends in the form of individual sensors for each. You can then group them to create a nice panel in your groups.yml file:

xbl_friends:
name: Xbox Live Friends
view: no
entities:
- sensor.realangrymonkey
- sensor.qwik

The end result looks like this:

Recently I found myself needing to perform a downgrade of Home Assistant in Hassio which wasn’t immediately obvious. If you need to downgrade your Hassio install enable the ssh add-on (or the web based one) and enter the following command on the console:

curl -d '{"version": "0.57.1"}' http://hassio/homeassistant/update

The command will hang for bit while Hassio downloads the different versions and prepares to install it.


In a previous post I mentioned I had recently picked up a HiLetgo ESP8266 NodeMCU module along with a DHT22 temperature and humidity sensor. In this post, I’ll describe how I combined the board, the sensor, hass.io and MQTT using the mosquito add-on for hass.io to create a temperature sensor for my home office.

I’m not going to go into detail about how to setup hass.io on a Raspberry PI, their site does an excellent job of describing how to get it installed, but I do highly recommend using that installation method if you’re on the fence. Raspberry PIs are inexpensive and Home Assistant runs quite well on the platform.

Instead, I’m going to concentrate on what it takes to get this working while going over what you need to enable in hass.io to support a small, WiFi enabled board sending temperature and humidity readings.

Continue reading

What self respecting geek wouldn’t like home automation products? X10, yea that company with the ridiculous pop-up ads all over the web about the “spy” cameras they sell, actually makes some neat stuff that is inexpensive (although some of it’s cheap too). These products allow you to, among other things, remotely control lights and appliances using X10 enabled modules. X10 is actually the name of a company but also the name of a communication protocol used by these devices to well…communicate. Today, there are a number of products that either compete or compliment the X10 products that have existed for years. I’ll get to those later.

I got my first taste of X10 products when I lived at home. We lived in a smaller house and there weren’t quite enough bedrooms for everyone. I decided it was time for me to create my own room and that’s what I did. I converted our old toy room into my bedroom. The problem, there was no way for me to control the lights in the downstairs area once I was down there. After a bit of research, I found a couple of products at a local Radio Shack that would allow me to remotely control the basement lights from my new room. The products allowed me not only to remote turn off and on the lights, but also dim them, something we couldn’t do before.

Continue reading